A practical guide to editing, standardizing, and enhancing product images from the product editor
⚡ Quick Summary
The Advanced Image Control add-on gives you a built-in image editor on every product page — crop, flip, zoom, rotate, and pan without leaving Shipturtle. Enable it from Settings → Subscription and billing → Additional Features → Product. Optionally connect Photoroom for automatic background removal.
Overview
The Advanced Image Control add-on empowers merchants with a built-in image editing toolkit, right from the product details page. Designed to improve consistency and visual appeal, this feature lets you crop, rotate, zoom, flip, and adjust image ratios effortlessly — without the need for external tools. Whether you're standardizing product galleries or optimizing images for your storefront layout, this intuitive add-on ensures every product image aligns perfectly with your brand's visual standards.
In this guide, you'll learn how to:
- Enable the image add-on from Subscription and billing.
- Find the image editor when adding or editing a product.
- Crop, flip, zoom, pan, and rotate product images.
- Set up the Photoroom integration for automatic background removal.
1. Enable the Add-On
Image add-ons are activated from your subscription settings:
- Open Settings from the left navigation menu and select Subscription and billing.
- Scroll to Additional Features and select the Product tab.
- Under Product & Listings, find Photoroom Image and click Add. Cards that are already active show Added.
- Review the You have selected panel and click Next to complete the update.
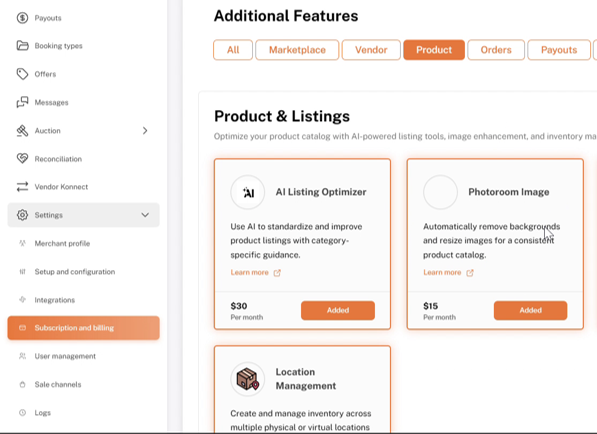
Settings → Subscription and billing → Additional Features → Product: Product & Listings add-ons
2. Where to Find the Advanced Image Control Feature
The Advanced Image Control tool is integrated into key areas of the Shipturtle dashboard. You can access the feature from the following sections:
Products → Manage Products → Edit Product
- Open Products from the left navigation menu and select Manage products.
- Click the Edit (pencil) icon in the Actions column of the product you wish to update.
- Open the product images to launch the image editor.
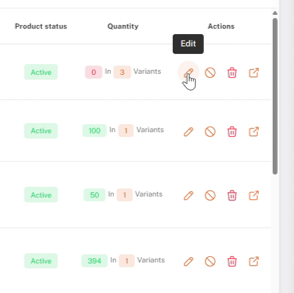
Products → Manage products: Edit action on the product list
3. Upload an Image While Adding a Product
While adding a new product, you can launch the image editor during the image upload step. This lets you crop, rotate, or zoom before the product goes live.
- Open Products and select Add products.
- In the Images area, drag and drop an image or click Browse images or videos.
- Select the image file from your computer. The Add images window opens with your image.
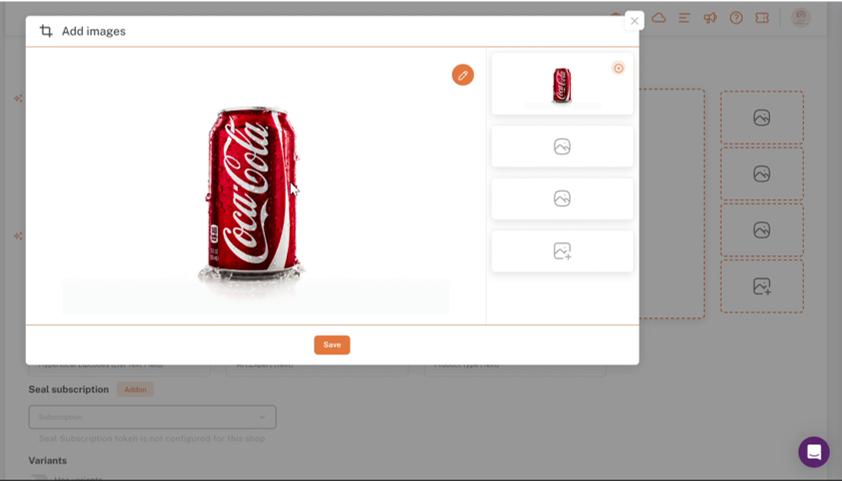
Products → Add products: Images upload area
4. Open the Image Editor
The Add images window shows the selected image with thumbnails of all uploaded images on the right.
- Select the image you want to edit from the thumbnails.
- Click the Edit (pencil) icon at the top-right corner of the image to open the Advanced Image Control editor.
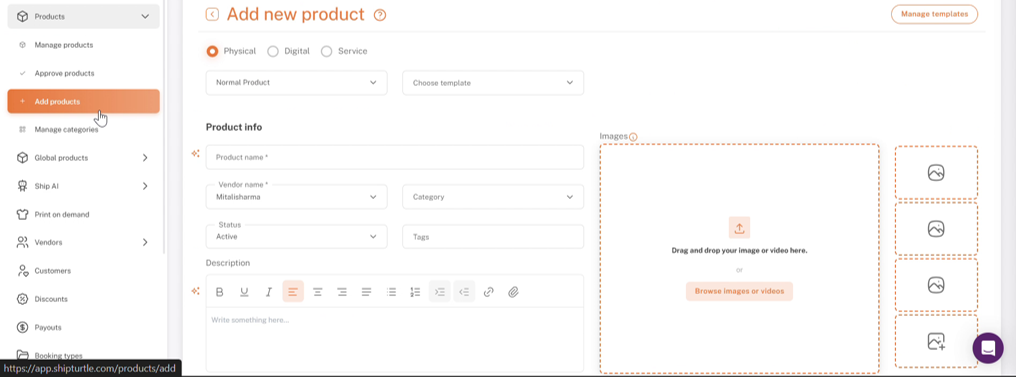
Add images window: image preview with the Edit (pencil) icon
5. Feature Highlights
The Advanced Image Control add-on equips you with a full suite of image editing tools, available from the toolbar below the image. The current image size is shown above the toolbar (for example, Width: 1440px | Height: 960px).
Crop
Easily crop your product images to a perfect square (1:1 ratio) — ideal for platforms that require uniform thumbnails. Alternatively, use manual cropping by dragging the corners or sides of the crop frame to achieve custom aspect ratios.
Flip Options
Instantly flip images horizontally or vertically to adjust product orientation.
Zoom and Pan
Zoom in and out of images to get a closer look or to reframe important product details. After zooming, pan across the image by dragging, or use the arrow buttons to move it up, down, left, or right.
Rotate Options
Quickly rotate images clockwise or counterclockwise. This is particularly useful for correcting image orientation after uploading.
Preview your changes in real time. Once you're satisfied, click Save to apply the edit, or Cancel to discard it.
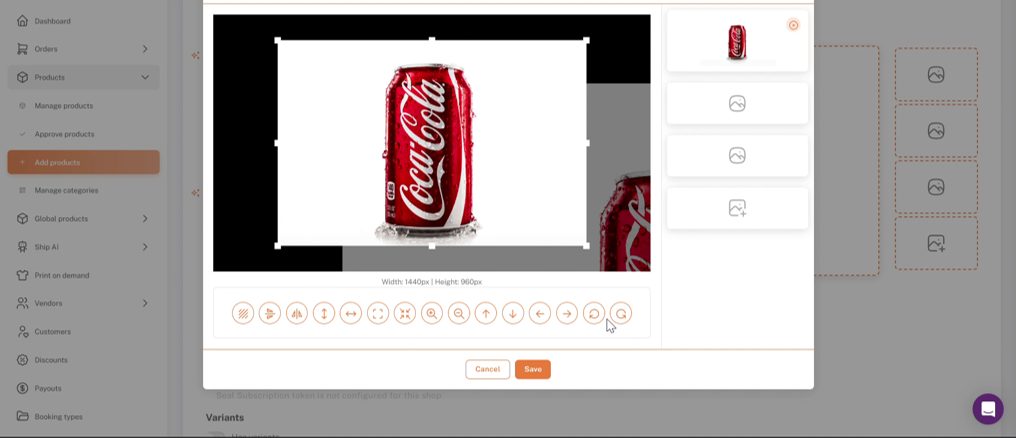
Advanced Image Control editor: crop frame, image size, and editing toolbar
6. Set Up Photoroom Background Removal
With the Photoroom Image add-on, backgrounds are removed and images resized automatically for a consistent product catalog. Connect Photoroom once from Integrations:
- Open Settings and select Integrations.
- Under Other integrations, find Photoroom and click Configure.
7. Configure Photoroom Settings
On the Photoroom integration page:
- Enter your Photoroom access key.
- Under Photoroom background color, choose Transparent, or click Choose color and pick a background color.
- Click Save.
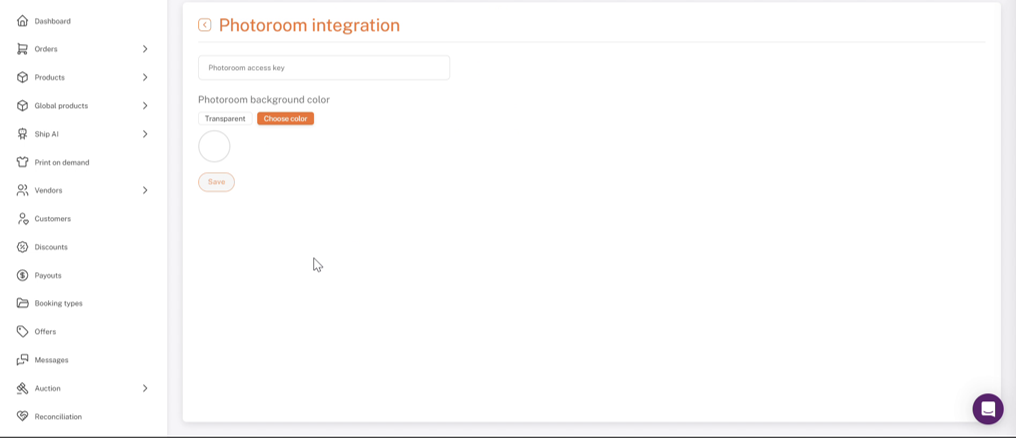
Settings → Integrations → Photoroom integration: access key and background color
FAQs & Troubleshooting
- I can't see the Edit (pencil) icon on my product images.
Check that the add-on shows Added under Settings → Subscription and billing → Additional Features → Product. - Do my edits change the original file on my computer?
No. Edits apply to the product image in Shipturtle only after you click Save. - Photoroom background removal isn't working.
Open Settings → Integrations → Photoroom and confirm your access key is entered and saved. - How do I undo an edit before saving?
Click Cancel in the editor to discard your changes.
Need Help?
If you're stuck, contact the Shipturtle support team at team@shipturtle.com or raise a support ticket through the Shipturtle support page.