Review Shipping Settings in Shipturtle
Every shipping setting a merchant can configure now lives in one place. This guide walks through each section — what it does, what changed since the last version of this article, and where to find settings that moved.
All merchant-facing shipping settings now live under Settings → Setup and configuration → Shipping settings, organized into five sections: Shipping label settings, Package dimensions, Multi-item calculation, Vendor permissions, and NDR settings. The old “Multivendor Settings” path and the separate Merchant Profile label-size page are gone — both are folded into this one screen.
Who this guide is for
Marketplace admins and merchants configuring shipping for the first time, or checking an existing setup after a Shipturtle update.
Before you begin
- Admin access to your Shipturtle account.
- Know whether you manage warehouses or package dimensions per-vendor — several settings here can be overridden at the vendor level from the vendor's own edit page.
Step-by-step
Step 1: Open Shipping settings
From the left sidebar, go to Settings → Setup and configuration, then select the Shipping settings tab from the list on the left. This replaces the old Multivendor Settings → Shipping Settings path — the destination is the same idea, just renamed and reorganized.
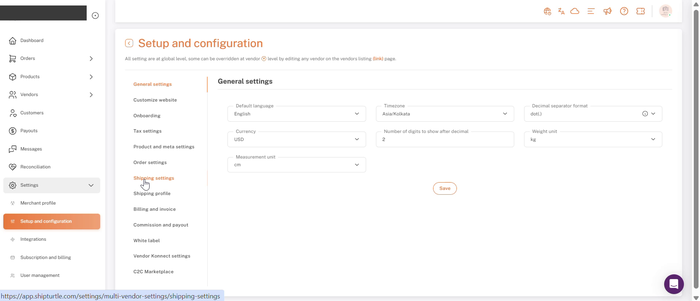
Setup and configuration → Shipping settings, in the tab list on the left.
Step 2: Review the five setting groups
The Shipping settings tab groups everything into five collapsible sections. Click any section's header to expand it — only one needs to be open at a time.
- Shipping label settings: Configure Shopify sync, label content, default label size, and validation rules for order fulfillment.
- Package dimensions: Create default package dimensions for shipping.
- Multi-item calculation: Configure how package dimensions are calculated when an order contains multiple items or quantities.
- Vendor permissions: Configure vendor permissions and defaults for managing shipping, labels, warehouses, and order handling.
- NDR settings: Manage failed deliveries (RTO/NDR) by notifying stakeholders and enabling quick action to resolve delivery issues.
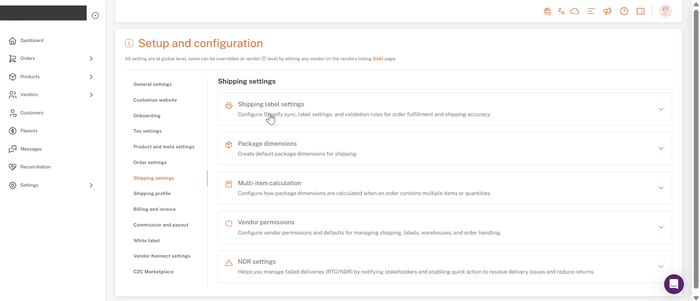
The five sections under Shipping settings, collapsed.
Step 3: Configure shipping label settings
Expand Shipping label settings to control how labels and Shopify stay in sync:
- Automatically update order status on Shopify: When enabled, updates order fulfillment, shipper, and tracking details on Shopify. Choose On Shipment (fulfills the moment the label is created) or In Transit (fulfills once the package is actually picked up).
- Automatically sync order status changes from Shopify to Shipturtle: Pulls shipper name and tracking number back into Shipturtle when Shopify's fulfillment status changes.
- Shipping label size: Choose A4 or Label 6×4 as the default label size. This is the same setting that used to live under Settings → Merchant Profile → Shipping Label Settings
- Email check / Phone check: Optionally require a customer email or phone number before a shipping label can be generated, so incomplete orders don't silently fail at the carrier.
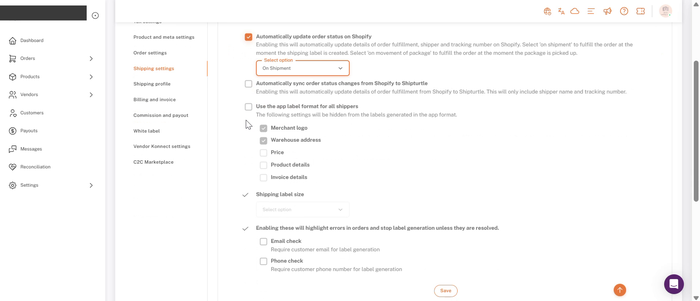
Shipping label settings, fully expanded.
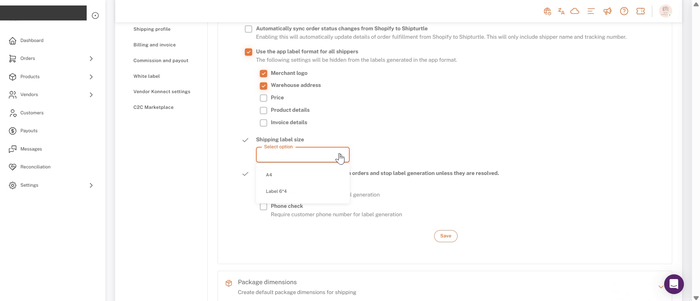
The Shipping label size dropdown — A4 or Label 6×4.
Step 4: Create default package dimensions
Expand Package dimensions and click Add dimensions to create a named preset (for example, “Small box” or “Standard mailer”) with a title and Length × Width × Height. Toggle “Check to make this dimensions as default” to have it auto-apply when no other dimension is set. Title, length, width, and height are all required, the form blocks Save until each is filled in.
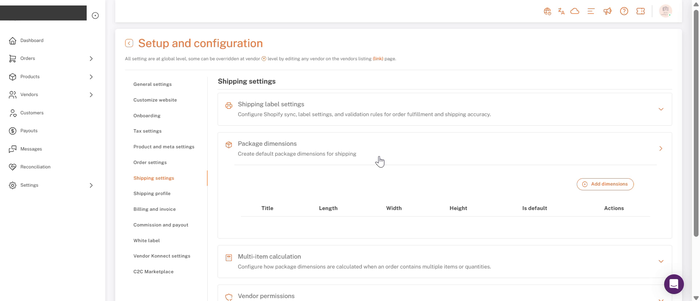
Package dimensions, with the Add dimensions button and the (empty) presets table.
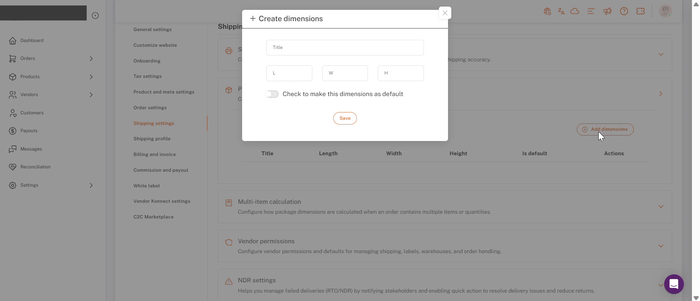
The Create dimensions dialog: Title, L, W, H, and a default toggle.
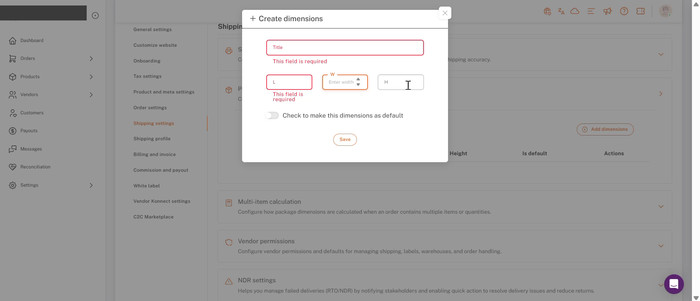
Required-field validation — Title, L, and W all need a value before Save will go through.
Step 5: Set how multi-item orders are calculated
Multi-item calculation controls how Shipturtle derives a single box size when an order contains more than one item. Weight is always summed regardless of which method you pick.
- Stacking: Takes the max length, max width, and sums all heights as if items were stacked. Example: 2×(15×10×5) + 1×(12×8×6) → 15 × 10 × 16 cm.
- Cube root: Sums all item volumes and takes the cube root, producing equal-sided box dimensions.
- Packing buffer: An extra percentage added to the calculated L, W, H to account for packing material, defaults to 10%.
- Snap to closest package: When enabled, matches the calculated size to the closest default package dimension you've created, instead of sending the raw calculated size to the shipping partner.
- Block on missing dimensions: When enabled, an order missing package dimensions shows a warning and only proceeds if the merchant or vendor confirms using a default package.
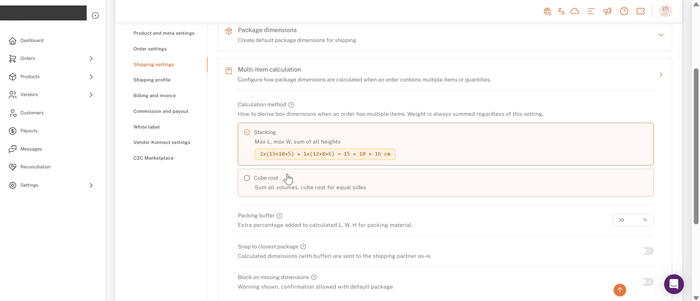
Multi-item calculation: Stacking vs. Cube root, packing buffer, and the two safety toggles.
Step 6: Set vendor permissions
Vendor permissions controls what vendors can do themselves versus what stays merchant-only. “Allow vendors to” is the master toggle for this group; the items below it can be enabled individually:
- Add their shipping partners: Vendors can connect their own carrier accounts.
- Generate shipping labels: Vendors can create shipping labels for their own orders.
- Cancel shipping labels: Vendors can cancel labels they've generated. This used to be bundled with “Generate shipping labels” as one toggle
- Change order warehouse: Vendors can change which warehouse an order ships from.
- Change order shipment status: Vendors can update an order's shipment status manually.
- Edit order package dimensions: Vendors can override package dimensions on an individual order.
- Allow vendors to change multi-item calculation settings: lets vendors override the Stacking/Cube root calculation method from Step 5 for their own orders.
Two more settings sit below the vendor action list:
- Require package dimensions for shipping label generation: New setting — when enabled, a vendor must add package dimensions before a shipping label can be generated for that order.
- Set default label size for all vendors: Shows the current default label size and links back to Shipping label settings (Step 3) to change it
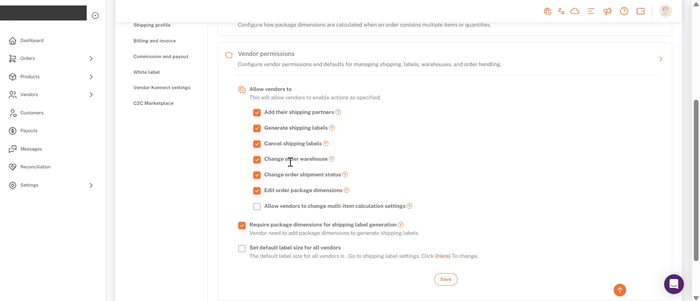
Vendor permissions, fully expanded, including the two new settings at the bottom.
Step 7: Configure NDR settings
NDR settings is a new section for handling failed deliveries (Return to Origin / Non-Delivery Reports). Choose how the SPOC (single point of contact) is emailed when a delivery fails:
- Each email separate: One email is sent per failed-delivery event as it happens.
- Single consolidated email at EOD : All of the day's NDR events are batched into one end-of-day summary email.
- Both separate and consolidated email: Sends both, an email per event, plus the end-of-day summary.
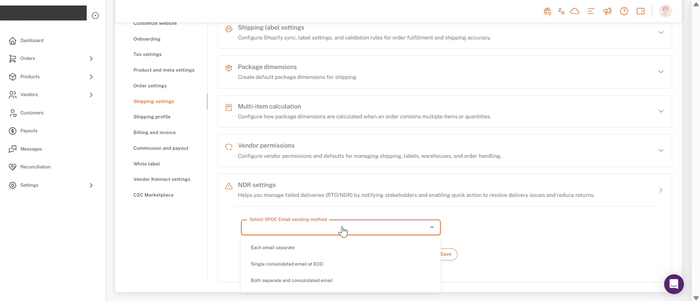
NDR settings, choosing the SPOC email sending method.
Add a Warehouse
When you install Shipturtle, it automatically imports your Shopify “Locations” as warehouses. To add a new one, go to Settings → Warehouses → Add new; to edit an existing one, go to Settings → Warehouses → Edit.
You can add as many warehouses as you need and set the one you use most often as your default. In multi-vendor marketplaces, warehouses are assigned to vendors, and a vendor's orders can only be processed from the warehouse(s) assigned to them.
Adding Product-Level Dimensions
This section also wasn't shown in the recording, so it's carried forward from the previous version — it complements the default package-dimension presets from Step 4, which apply when an order doesn't have product-level dimensions to fall back on.
This method is useful when an order consists of a single product, since Shipturtle can pick up that product's own dimensions automatically:
- Add dimensions manually — Go to Products, and add Length, Width, and Height on each product you want covered.
- Bulk add product dimensions — Download all products, add dimension details to the exported file, then re-upload it with the updated dimensions.
Once a product has its own dimensions set, any new order for that product picks them up automatically.
Checklist
- Confirmed the new location: Settings → Setup and configuration → Shipping settings.
- Shipping label settings reviewed, Shopify sync behavior, label content, and default label size all set intentionally.
- At least one default package dimension created, with a sensible one marked as default.
- Multi-item calculation method chosen (Stacking or Cube root) and packing buffer set.
- Vendor permissions reviewed, including the two newer toggles (multi-item override, required package dimensions).
- NDR SPOC email method chosen.
- Warehouses and any product-level dimensions checked separately — not covered by this recording, so verify these still match what's described above.
FAQs
Where do I set the default shipping label size now?
Inside Shipping settings → Shipping label settings → Shipping label size. The old Settings → Merchant Profile → Shipping Label Settings page is no longer where this lives — Vendor permissions still links here for convenience.
What's the difference between Stacking and Cube root for multi-item orders?
Stacking takes the largest length and width across all items and sums their heights — good when items are literally packed on top of each other. Cube root sums total volume and produces equal-sided dimensions — better when items are irregular or packed side by side.
Does “Snap to closest package” require default package dimensions to be set up first?
Yes — it matches the calculated size against the presets created in Package dimensions, so it has nothing to snap to if none exist yet.
Can vendors override the multi-item calculation method?
Only if you enable “Allow vendors to change multi-item calculation settings” under Vendor permissions, it's off by default.
What happens if package dimensions are missing on an order?
That depends on “Block on missing dimensions.” If it's on, the merchant or vendor sees a warning and has to confirm using a default package before continuing. If it's off, Shipturtle proceeds without that confirmation step.
Does this page apply per-vendor, or globally?
All settings on this page are global by default. Some can be overridden at the individual vendor level by editing that vendor from the vendor listing page.
Troubleshooting
A vendor can't generate or cancel shipping labels.
Check Vendor permissions, “Generate shipping labels” and “Cancel shipping labels” are now two separate toggles rather than one combined permission. Confirm both are enabled if the vendor needs to do both.
Package dimensions won't save.
Title, Length, Width, and Height are all required in the Create dimensions dialog — Save is blocked until every field has a value.
Multi-item orders are getting an unexpectedly large or small box size.
Check which Calculation method is selected. Stacking tends to produce taller, narrower boxes for multi-item orders; Cube root tends to produce more cube-like dimensions. Also check the Packing buffer percentage, which inflates whichever result you get.
Shipping labels are missing a customer's email or phone number.
Enable Email check and/or Phone check under Shipping label settings so orders missing that data are flagged before a label is generated, instead of failing later at the carrier.
NDR emails aren't reaching the right person, or are too frequent/infrequent.
Revisit the SPOC email sending method under NDR settings — switch between Each email separate, Single consolidated email at EOD, or both, depending on how your team wants to be notified.
If you're stuck, reach the Shipturtle team at team@shipturtle.com or open a ticket through the support page.