Overview
Live Chat lets your customers message vendors in real time about a product or about the vendor in general. As the marketplace merchant, you can see and join every conversation, and chat privately with your vendors. Live Chat is an add-on, and only signed-in customers can use it, so make sure the add-on is active on your plan and customer accounts are turned on in Shopify.
In this guide, you'll learn how to:
- Add the Live Chat button and the Messages page to your Shopify theme.
- Understand what customers see when they chat with a seller.
- Find, reply to, and manage conversations from the Live Chat inbox.
- Chat privately with your vendors.
- Connect a custom storefront using the Live Chat API.
1. Add the Live Chat Button to Product Pages
In your Shopify admin:
- Go to Sales channels → Online Store → Themes.
- Click Customize on your live theme.
- From the template menu at the top center, select Products → Default product.
- In the Product information section, click Add block.
- Open the Apps tab and select Live Chat. Place it near the Add to cart button.
- Adjust the settings and click Save.
Live Chat block settings
- Chat button: button text (default Chat with {vendor}), width, height, and colors.
- Chat panel: accent color and Quick reply suggestions, a comma-separated list shown as tappable chips. Leave it blank to hide them.
- App proxy URL prefix: default /a/dashboard. It must match the App Proxy URL in Shopify Admin → Settings → Apps → Shipturtle, without a trailing slash.
The Live Chat block can only be added to product templates.
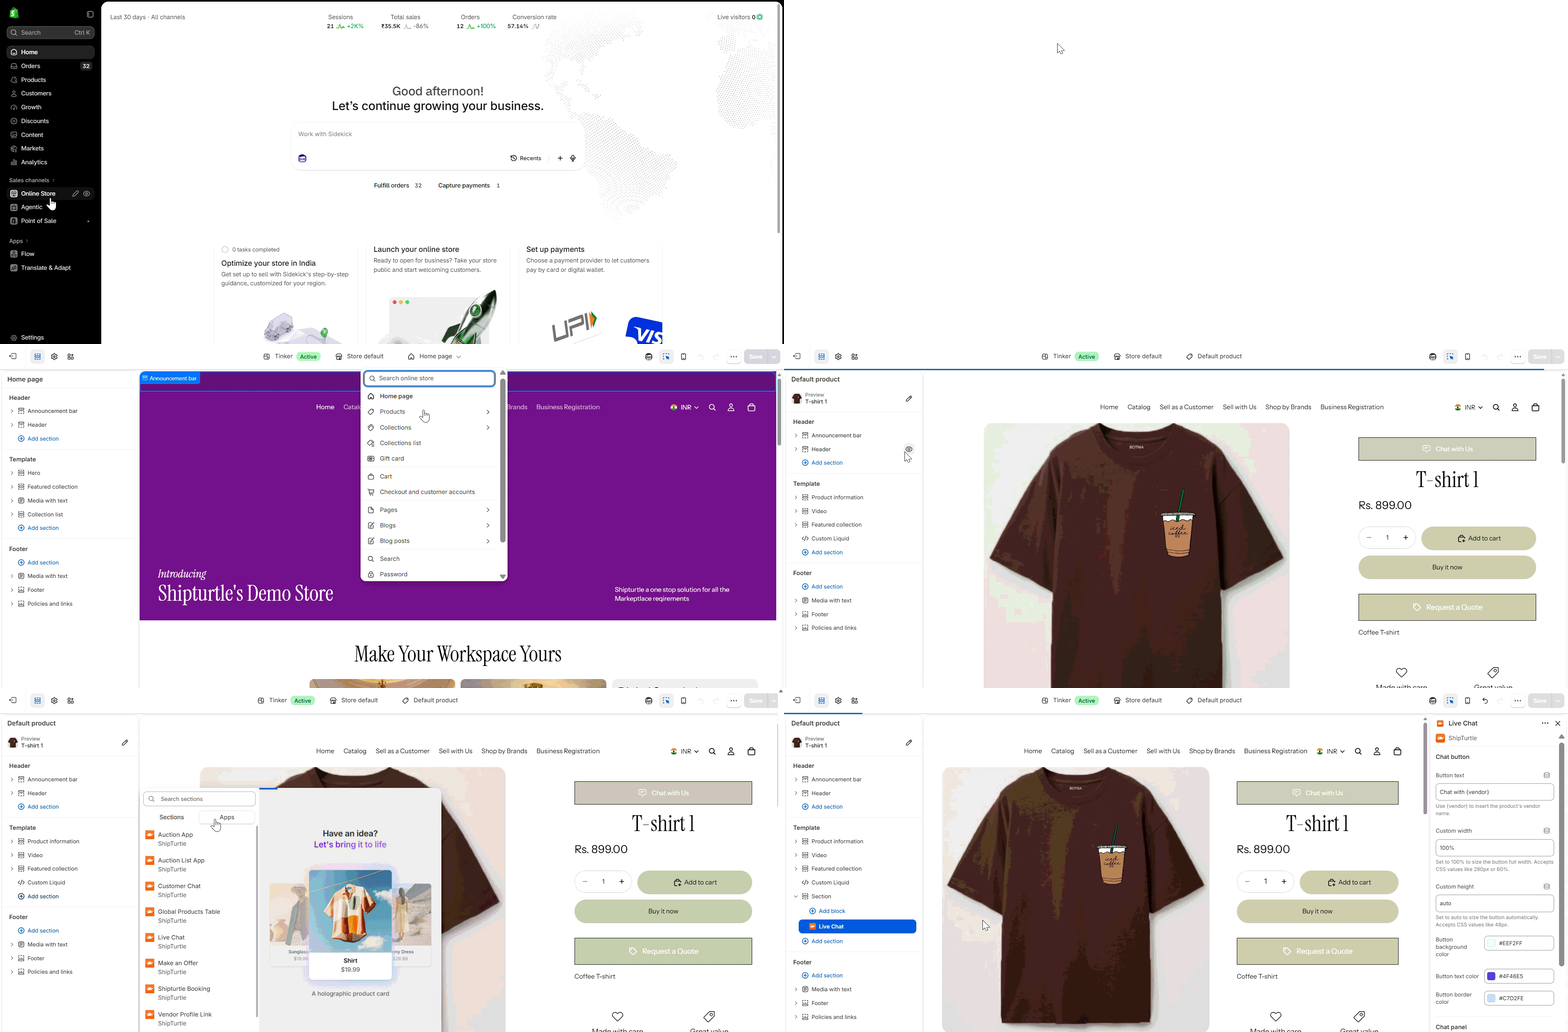
Theme editor → Default product → Add block → Apps: Live Chat block
2. Create the Messages Page Template
The Messages page is your customers' inbox for all their conversations. It must be available at /pages/messages.
- Go to Sales channels → Online Store → Themes. On your live theme, click ⋯ and select Edit code.
- In the templates folder, add a new page template named messages. It is saved as page.messages.json.
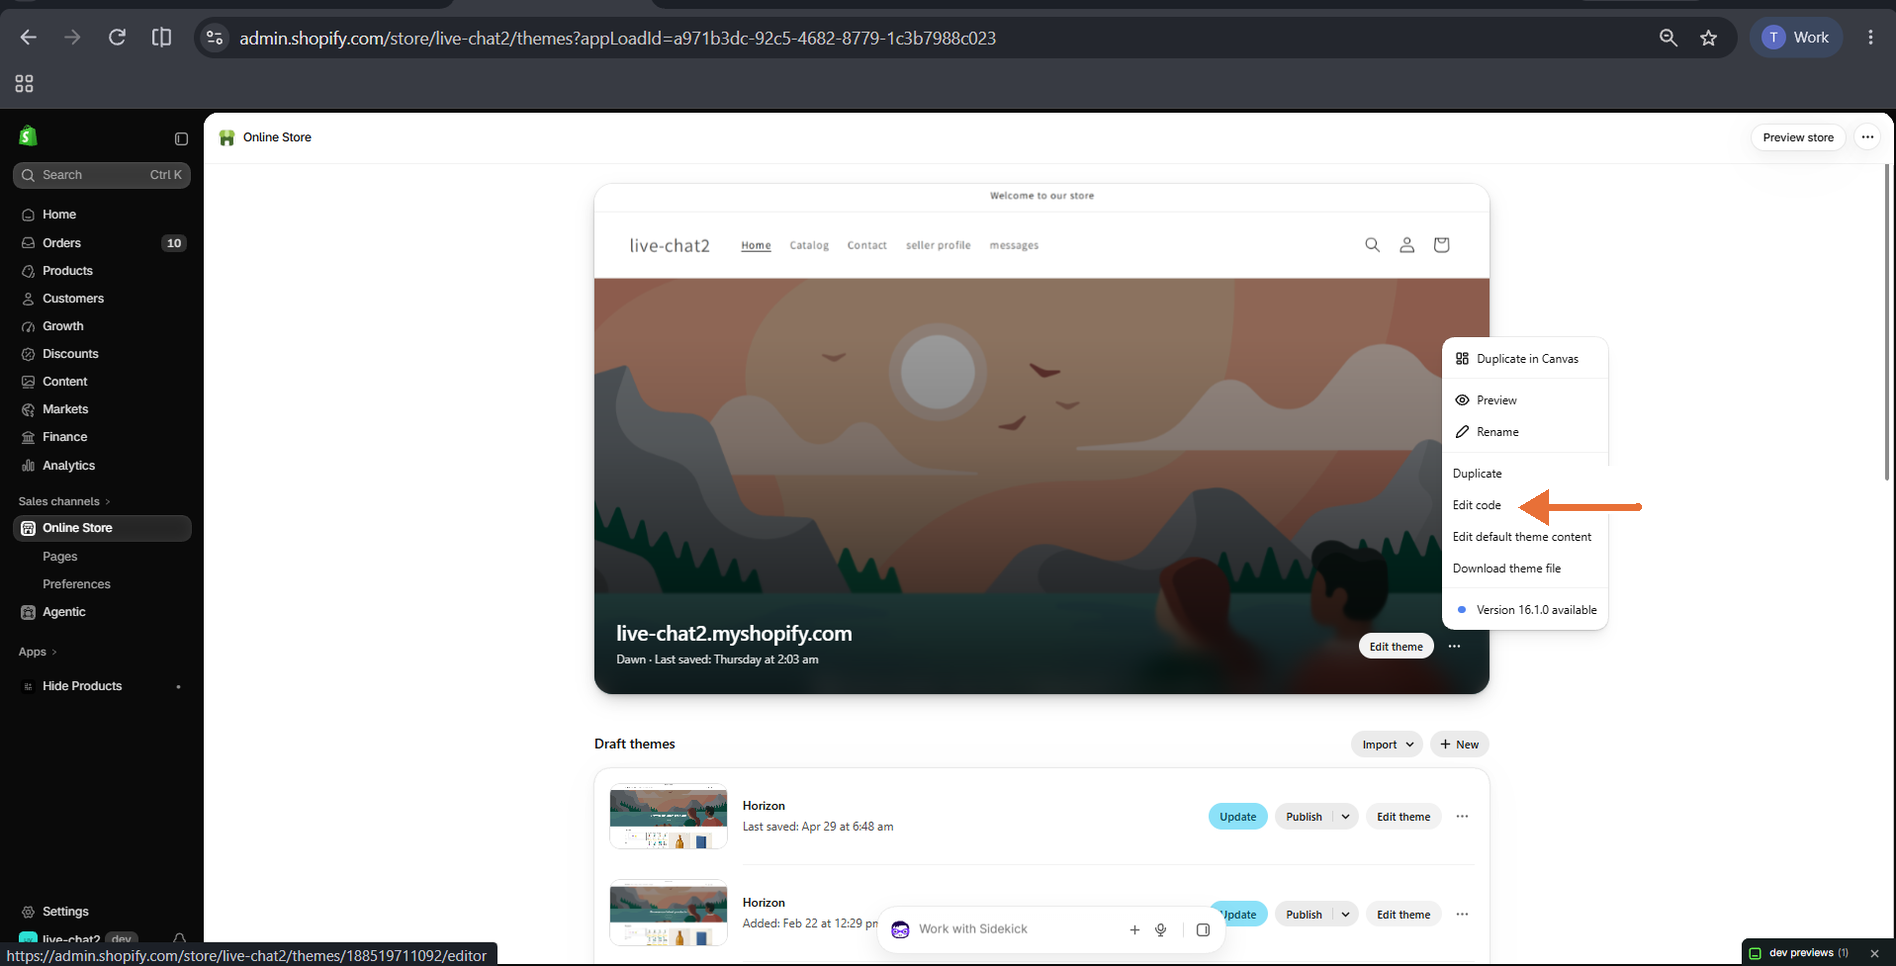
Online Store → Themes → ⋯ menu: Edit code
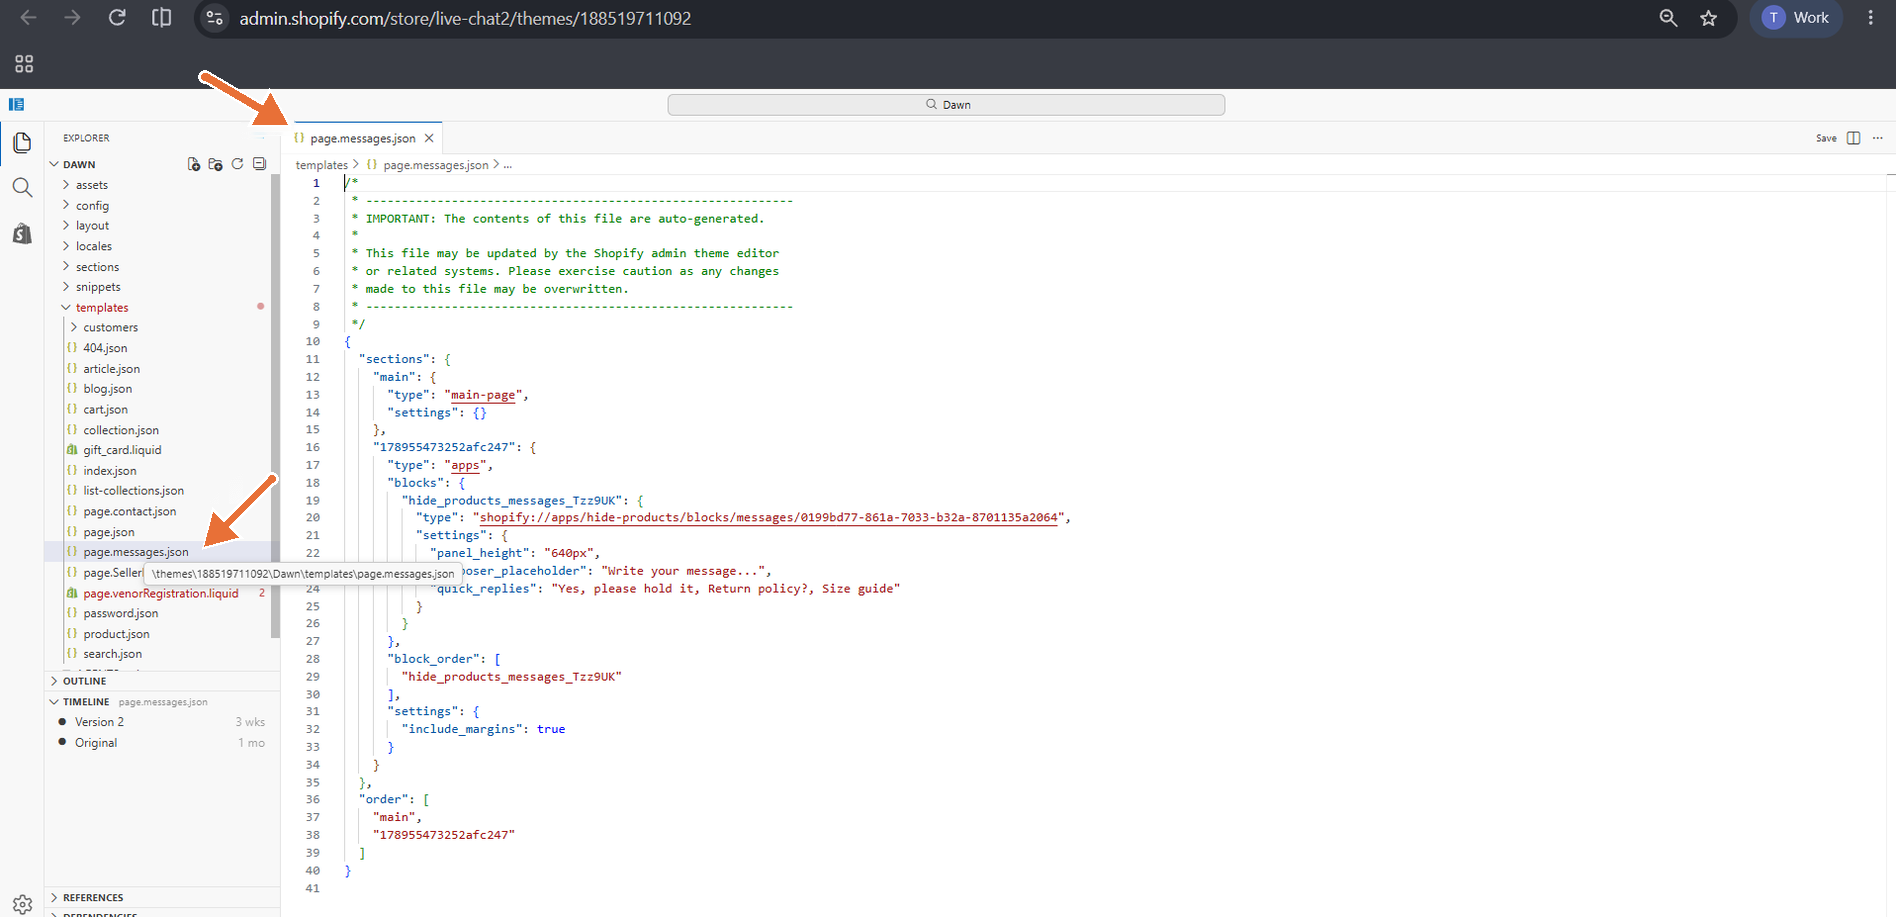
Edit code → templates: page.messages.json
3. Add the Messages Page
- Go to Sales channels → Online Store → Pages and click Add page.
- Enter a title, for example Messages.
- Under Template, select messages.
- Under Search engine listing, check that the URL ends in /pages/messages, then click Save.
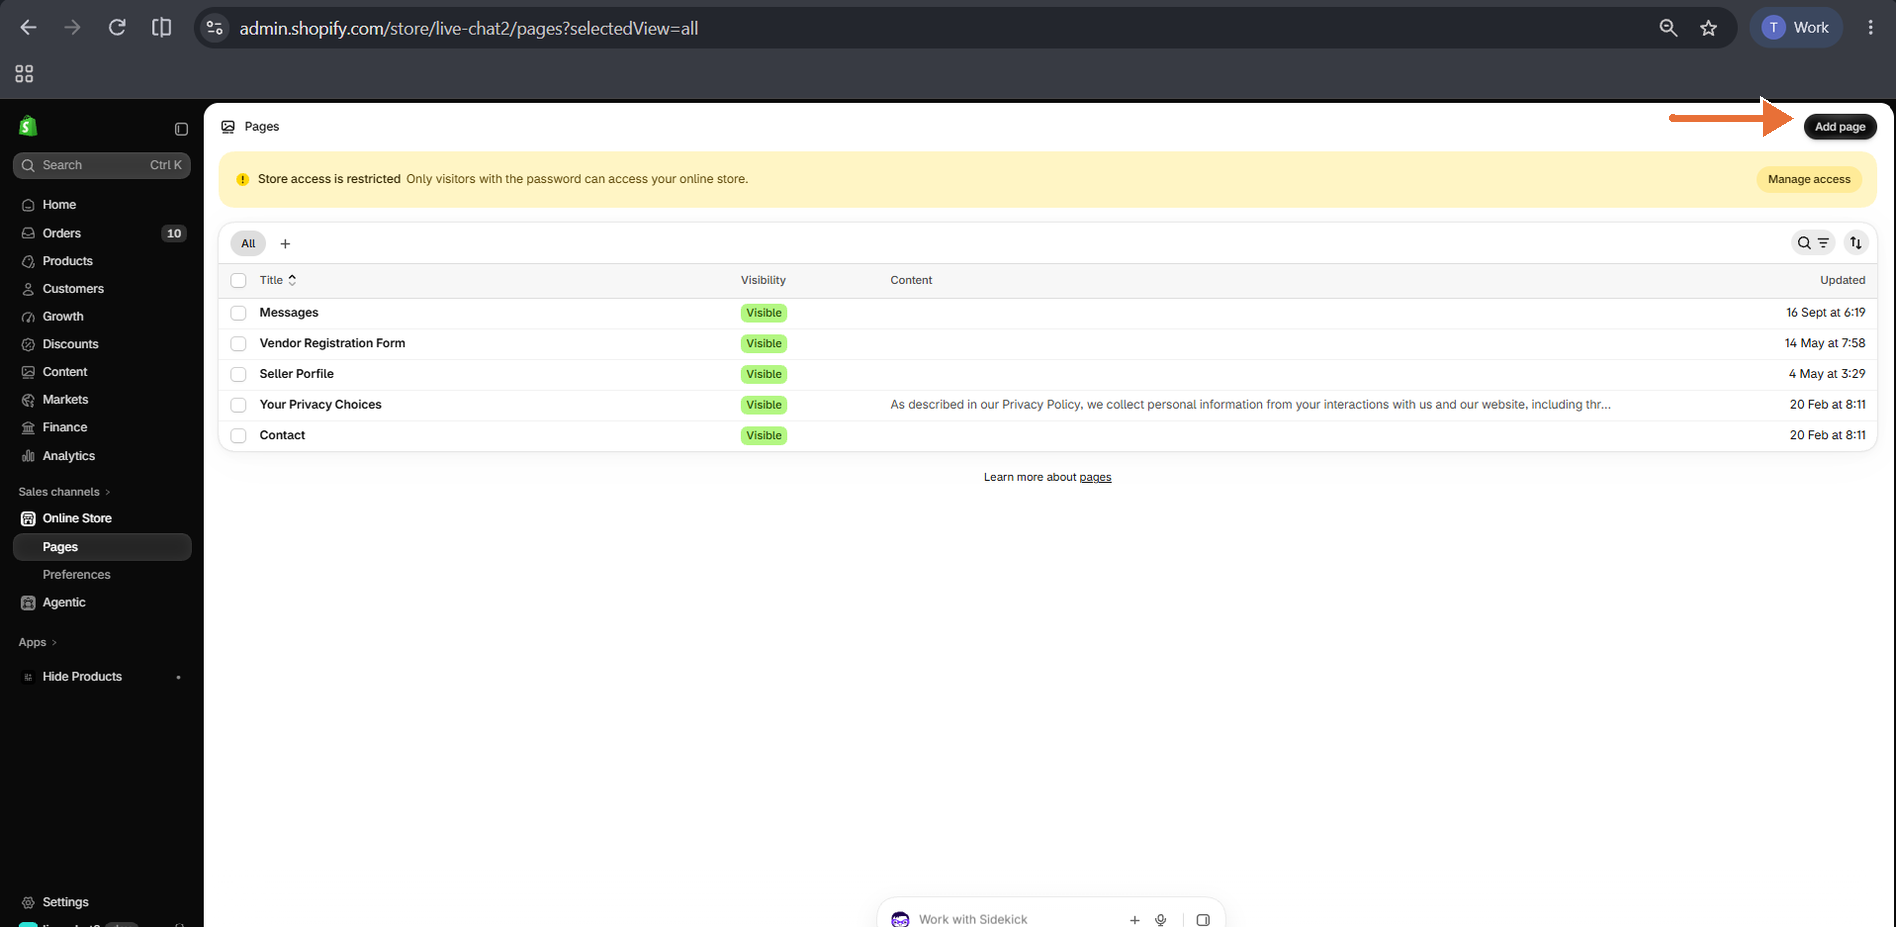
Online Store → Pages: Add page
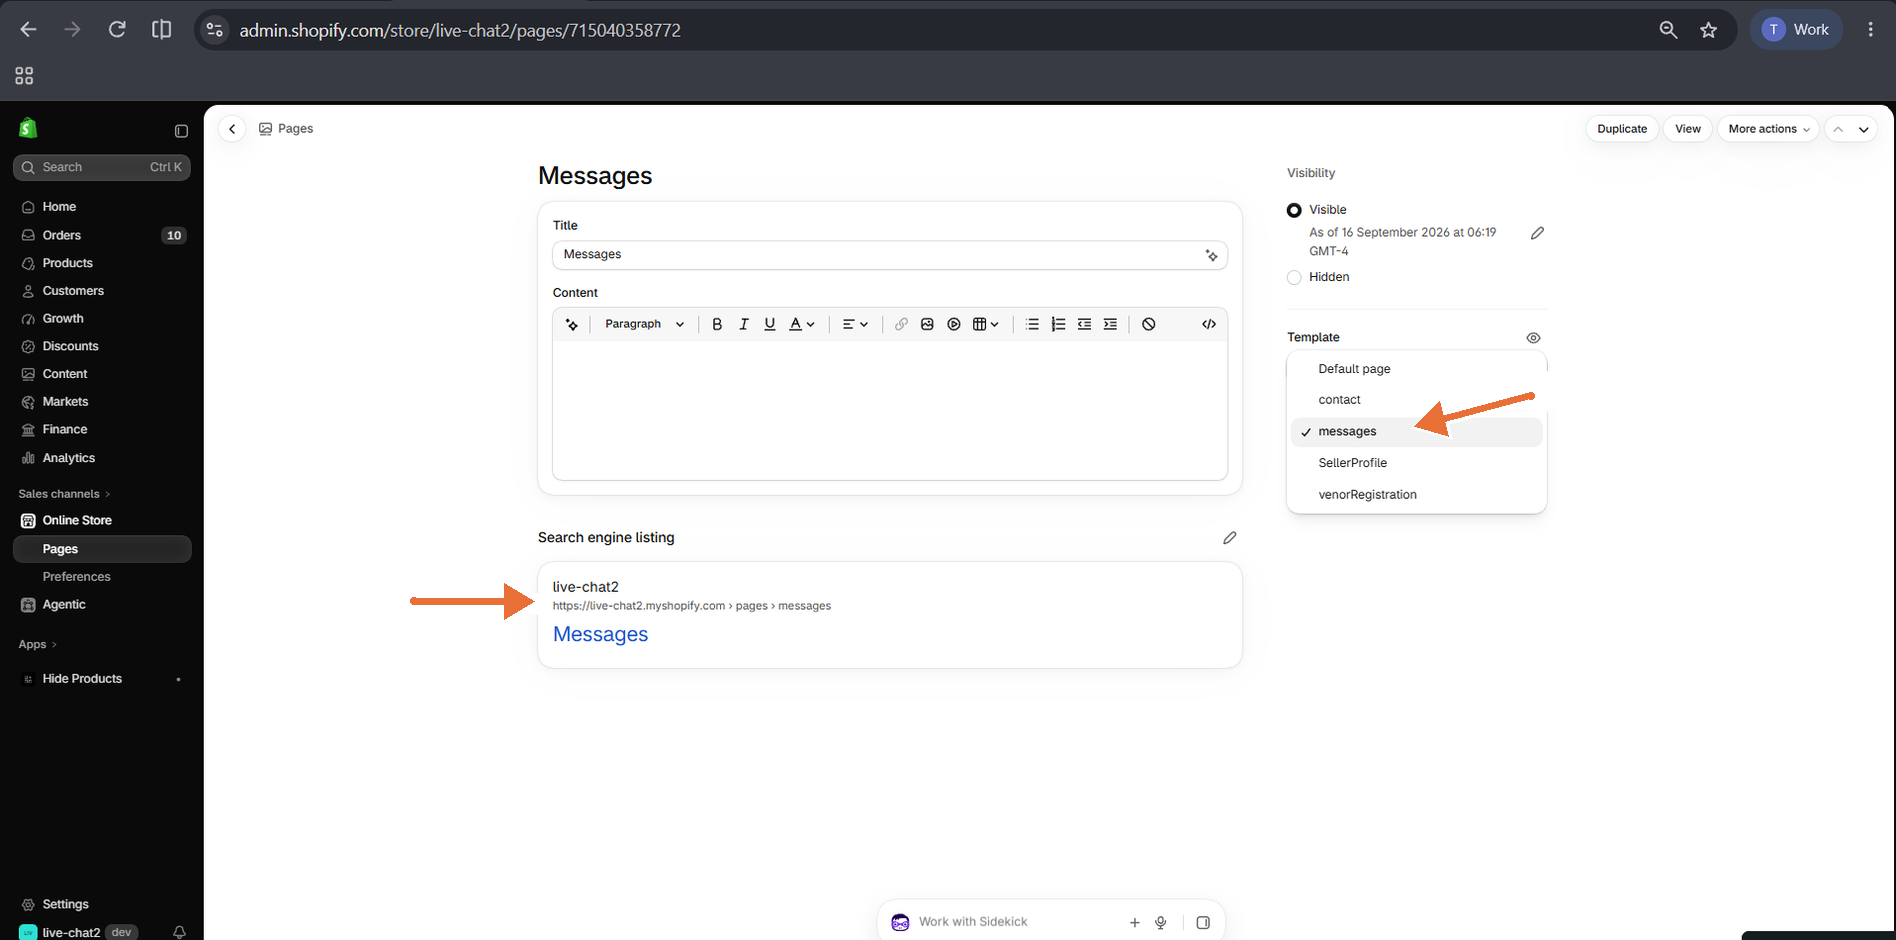
Messages page: messages template selected and /pages/messages URL
4. Add the Messages Block
- Go to Sales channels → Online Store → Themes and click Customize on your live theme.
- From the template menu at the top center, select Pages → messages.
- Click Add block, open Apps, and select Messages.
- Adjust the settings and click Save.
Messages block settings
- Panel height: height of the inbox (default 640px).
- Message box placeholder and Quick reply suggestions: each comma starts a new chip.
- Custom CSS: scope your styles to #st-messages-app so they don't affect the rest of your theme.
Signed-out visitors are sent to the sign-in page. Add a Messages link to your header or account menu so customers can find their conversations.
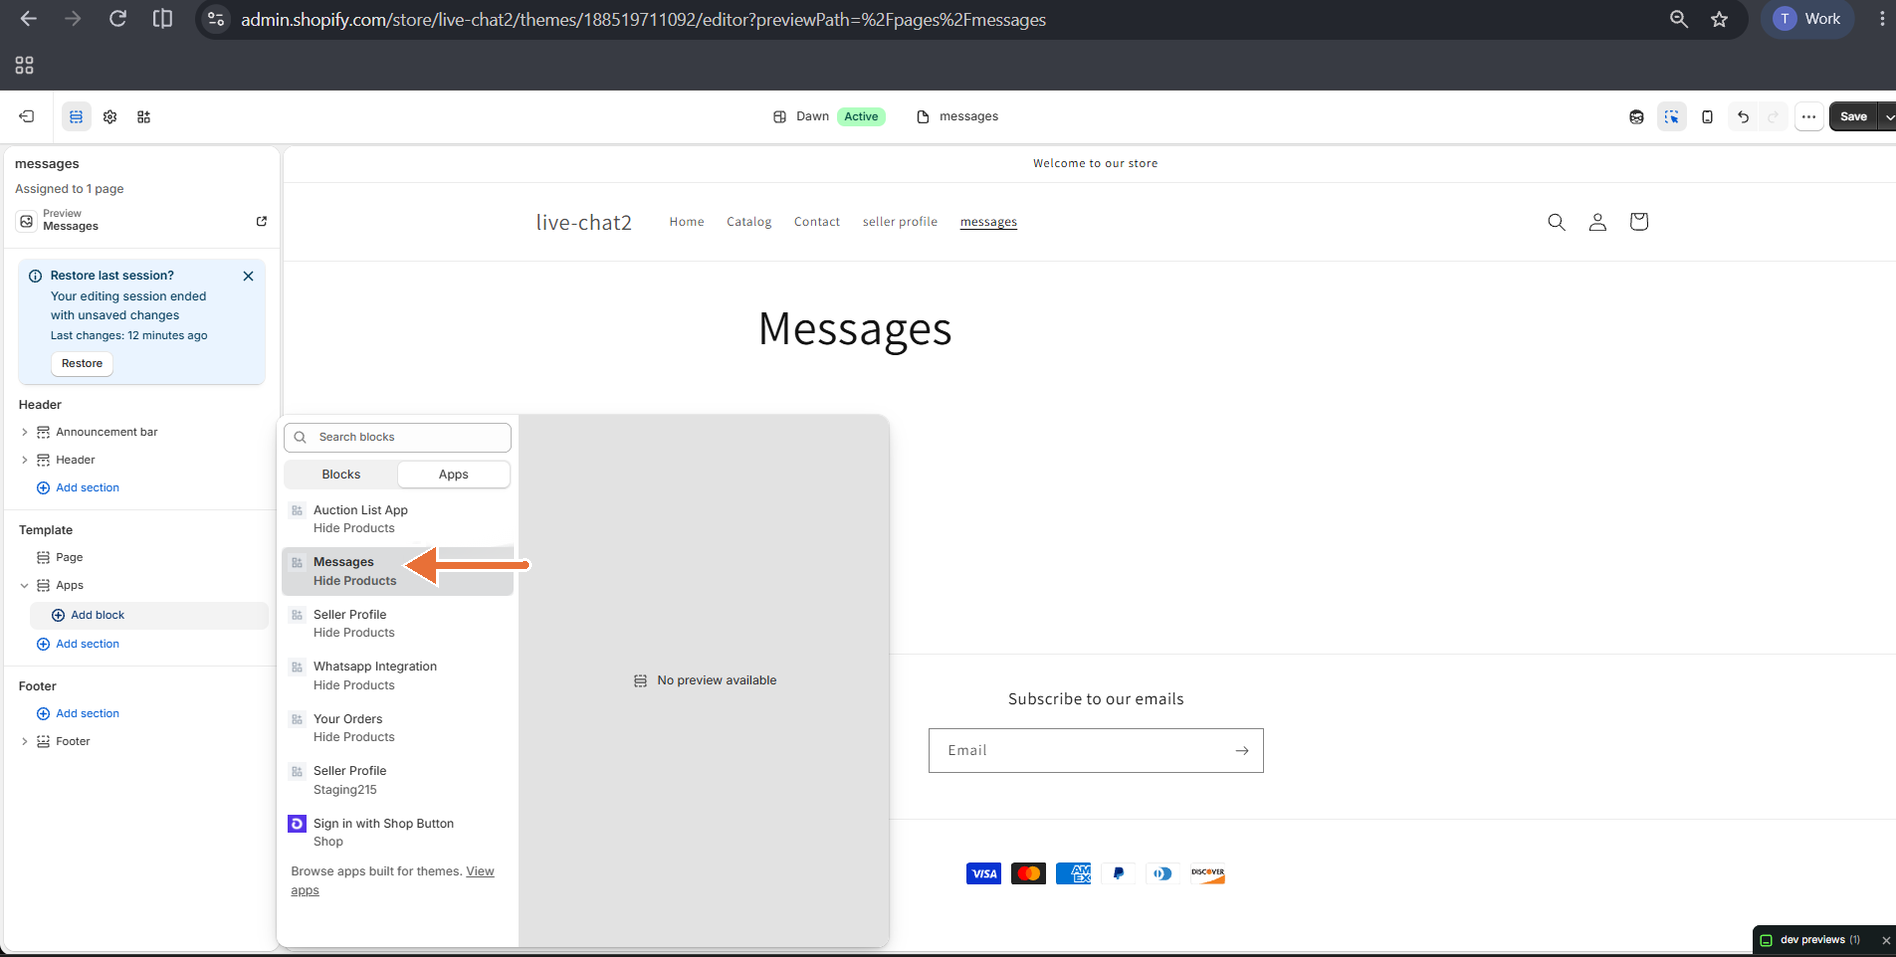
Theme editor → messages template → Add block → Apps: Messages block
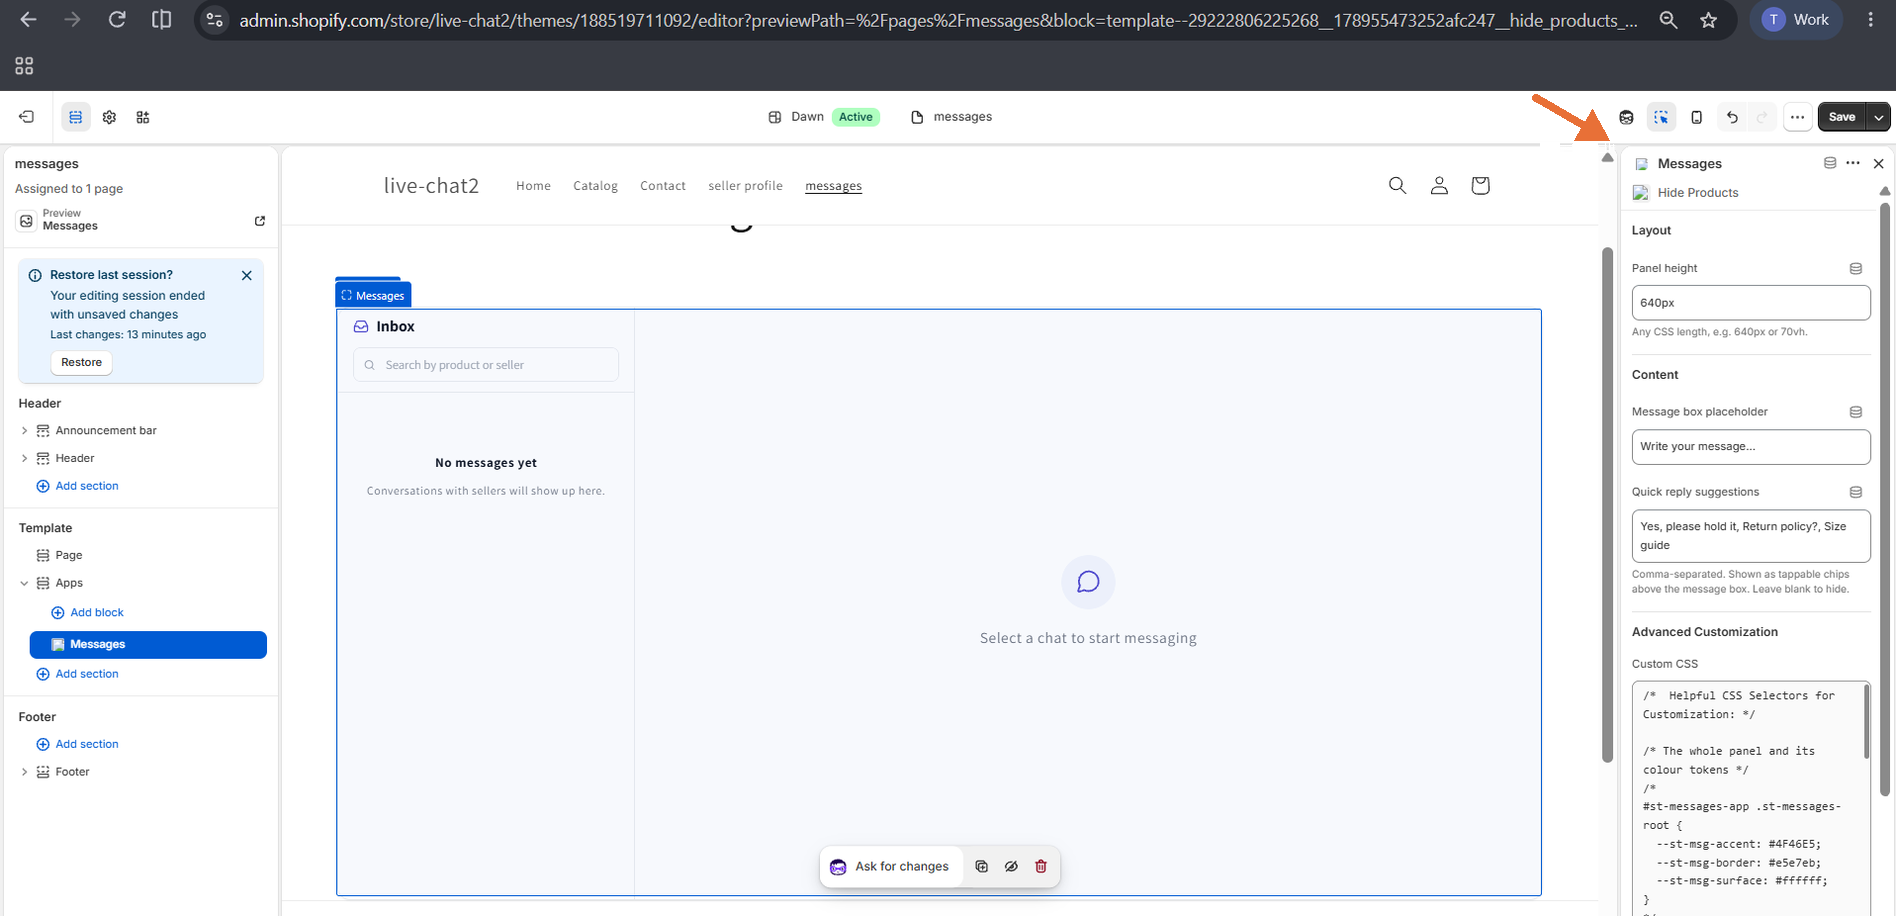
Messages block settings
5. Chat with Seller on Vendor Profile Pages
If you use the Shipturtle Seller Profile block, a Chat with seller button appears next to the vendor's name automatically. No setup is needed.
- Clicking Chat with seller opens the Messages page with that vendor.
- If the customer already has a conversation with the vendor, it opens. Otherwise, a new one starts with their first message.
- The Contact tab on the vendor profile is hidden while Live Chat is active.
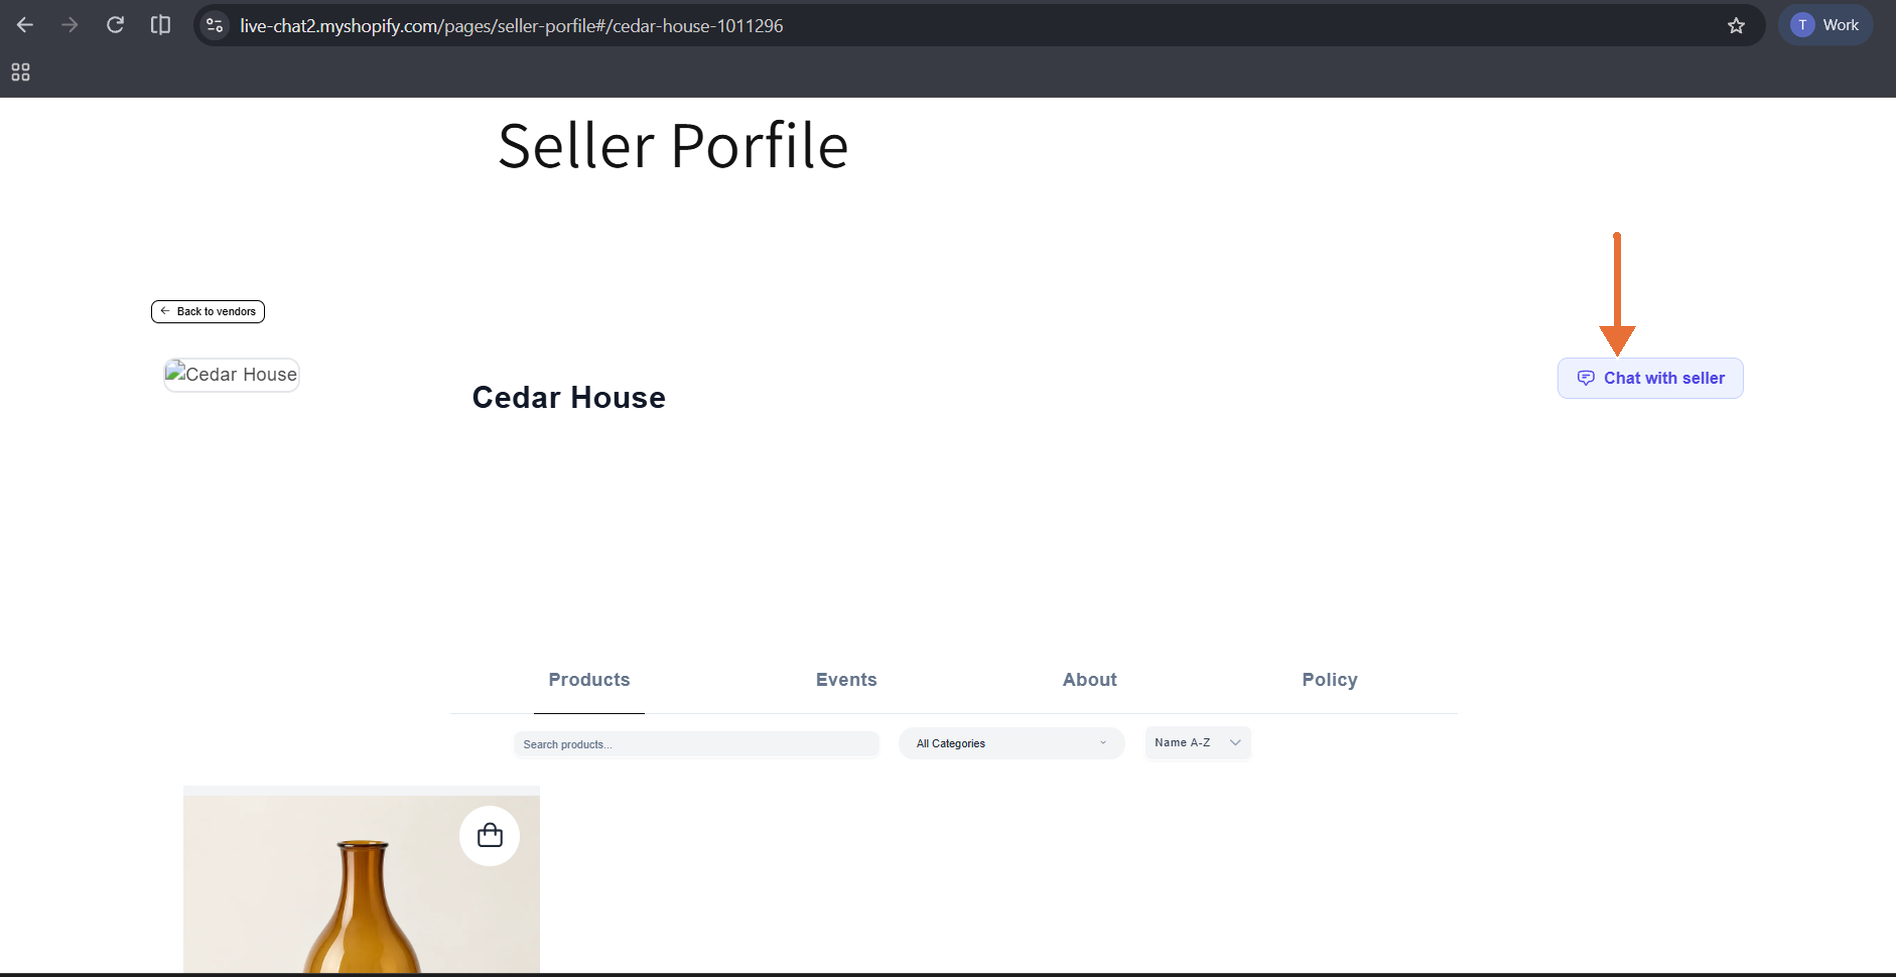
Vendor profile page: Chat with seller button
For more information, see Vendor Profile Page
6. What Your Customers See
Chatting from a product page
- The customer clicks Chat with
. If they aren't signed in, they are asked to sign in and then returned to the product. - A chat panel opens with the vendor name and the product details.
- The customer types a message or taps a quick reply chip, and sends it.
Each product has its own conversation, so customers see their earlier messages when they return. Files can be attached after the first text message.
Using the Messages page
- The Inbox lists every conversation with a preview, time, and unread badge.
- Customers can search by product or seller, and open a conversation to reply or attach files.
- Delivered changes to Seen once the seller reads the message.
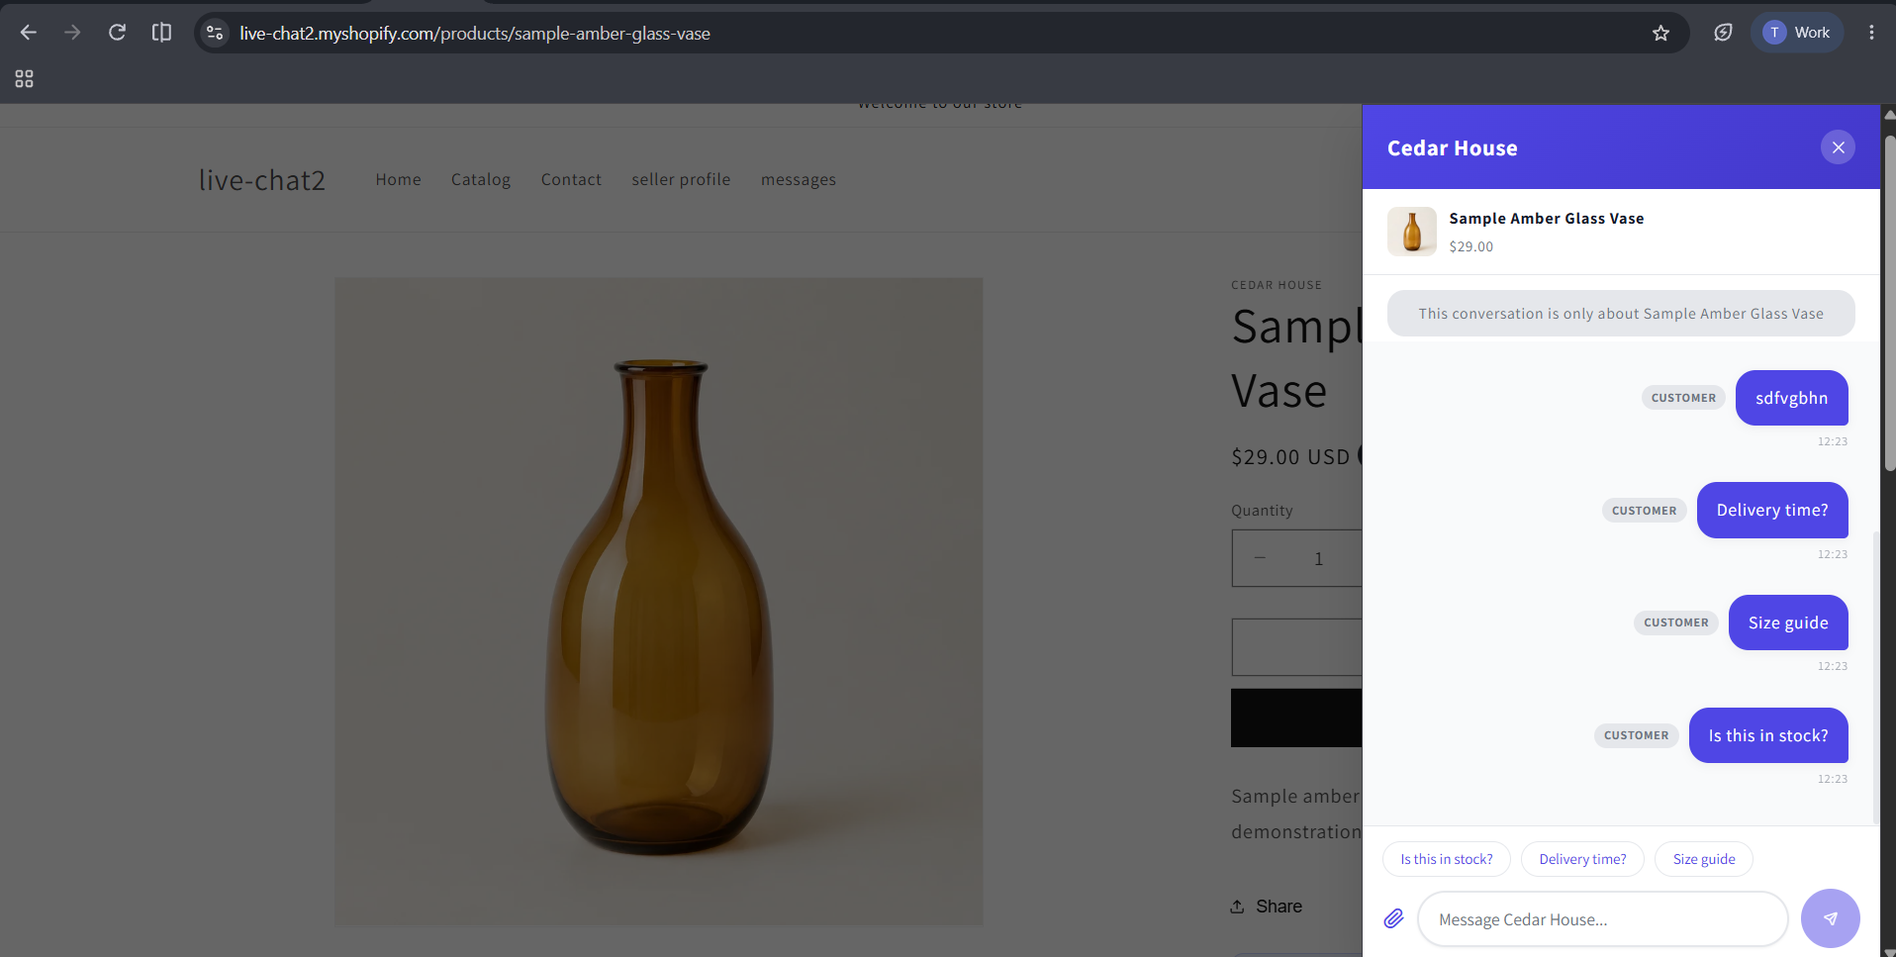
Product page: Live Chat panel with quick reply chips
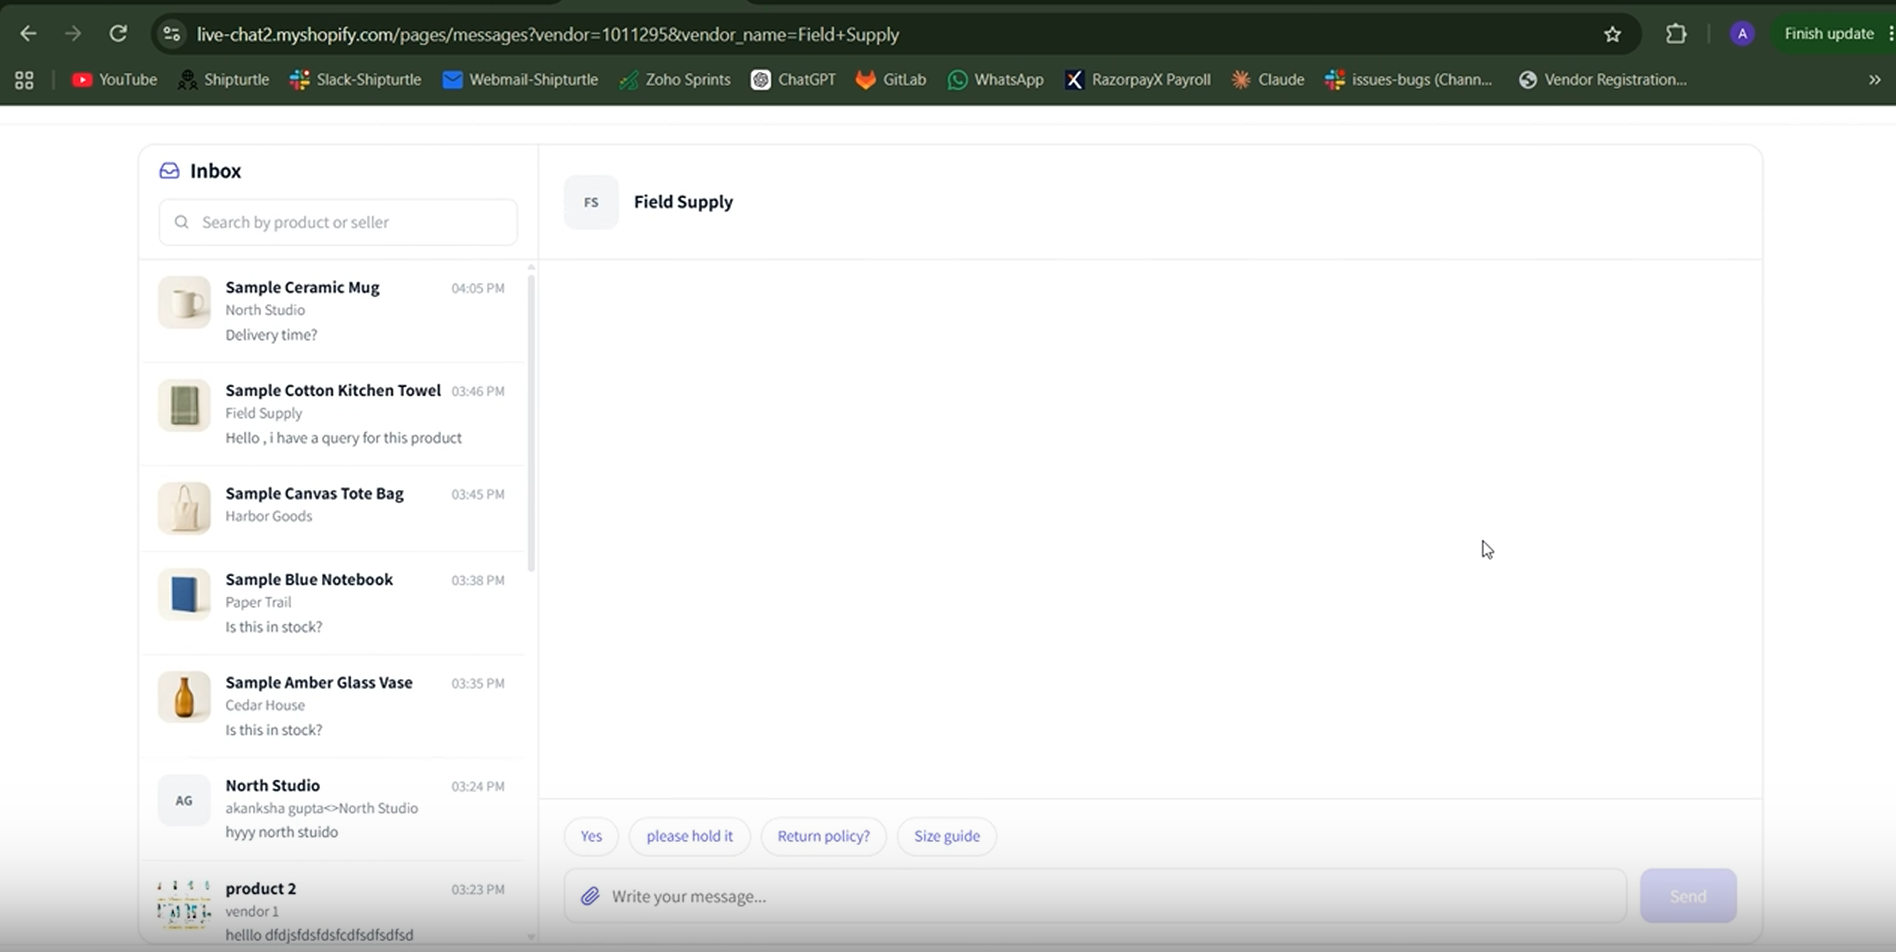
Messages page: Inbox and conversation
7. Open the Live Chat Inbox
- Log in to Shipturtle.
- Select Live Chat from the left navigation menu.
- Select a conversation from the list on the left to open it.
- Merchants see every conversation in the marketplace. Vendors see only conversations about their own products and profile.
- If Live Chat isn't in the menu, the add-on isn't active on your account.
Search and filter conversations
- Search conversations...: search by customer name or email, product, or subject. Merchants can also search by vendor.
- All, Open, and Resolved tabs: switch between conversation statuses.
- Filters (funnel icon): filter by sender email, vendor (merchants only), type (Product or General), and date.
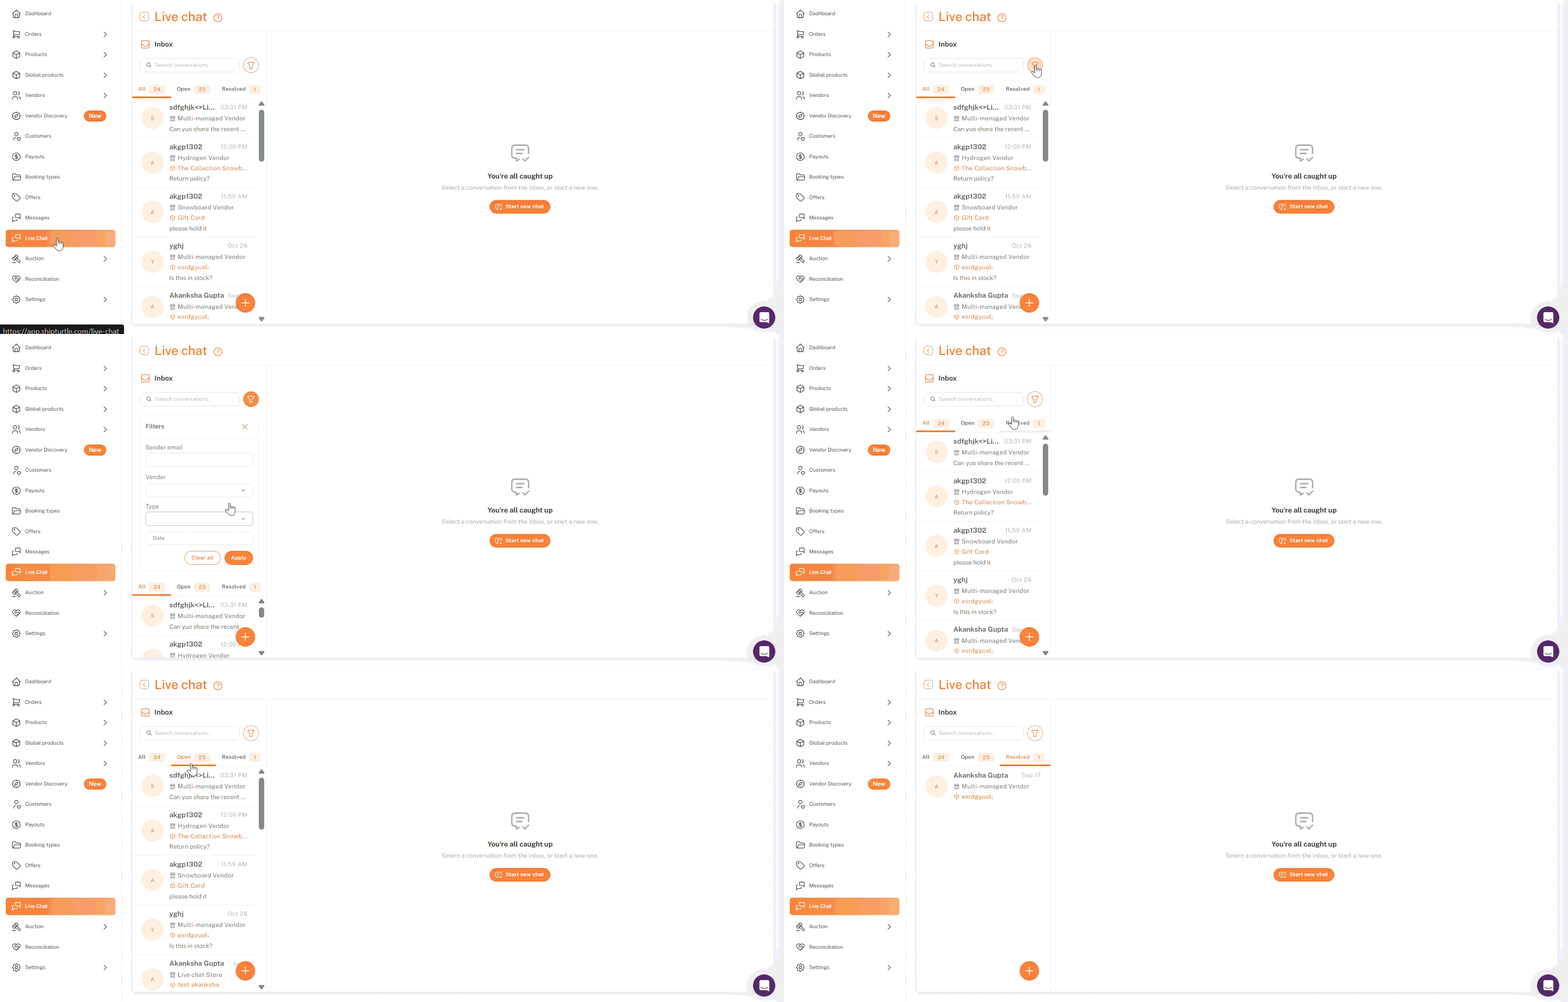
Shipturtle dashboard → Live Chat: inbox
8. Reply to a Conversation
- Open the conversation from the inbox. It is marked as read.
- Type your reply in the Type a message... box.
- To add files, click the paperclip icon and wait until each file turns green.
- Press Enter or click the send icon.
- Delivered changes to Seen once the other person reads your message.
- You can send up to 10 files per message, 10 MB each (JPG, PNG, GIF, WEBP, PDF, DOC, DOCX, XLS, XLSX, TXT, CSV).
- Messages can be up to 5,000 characters.
View conversation context
The Context Details panel on the right shows where the conversation started, the customer's name and email, and the product details. Click the product title to open the product in Shipturtle.
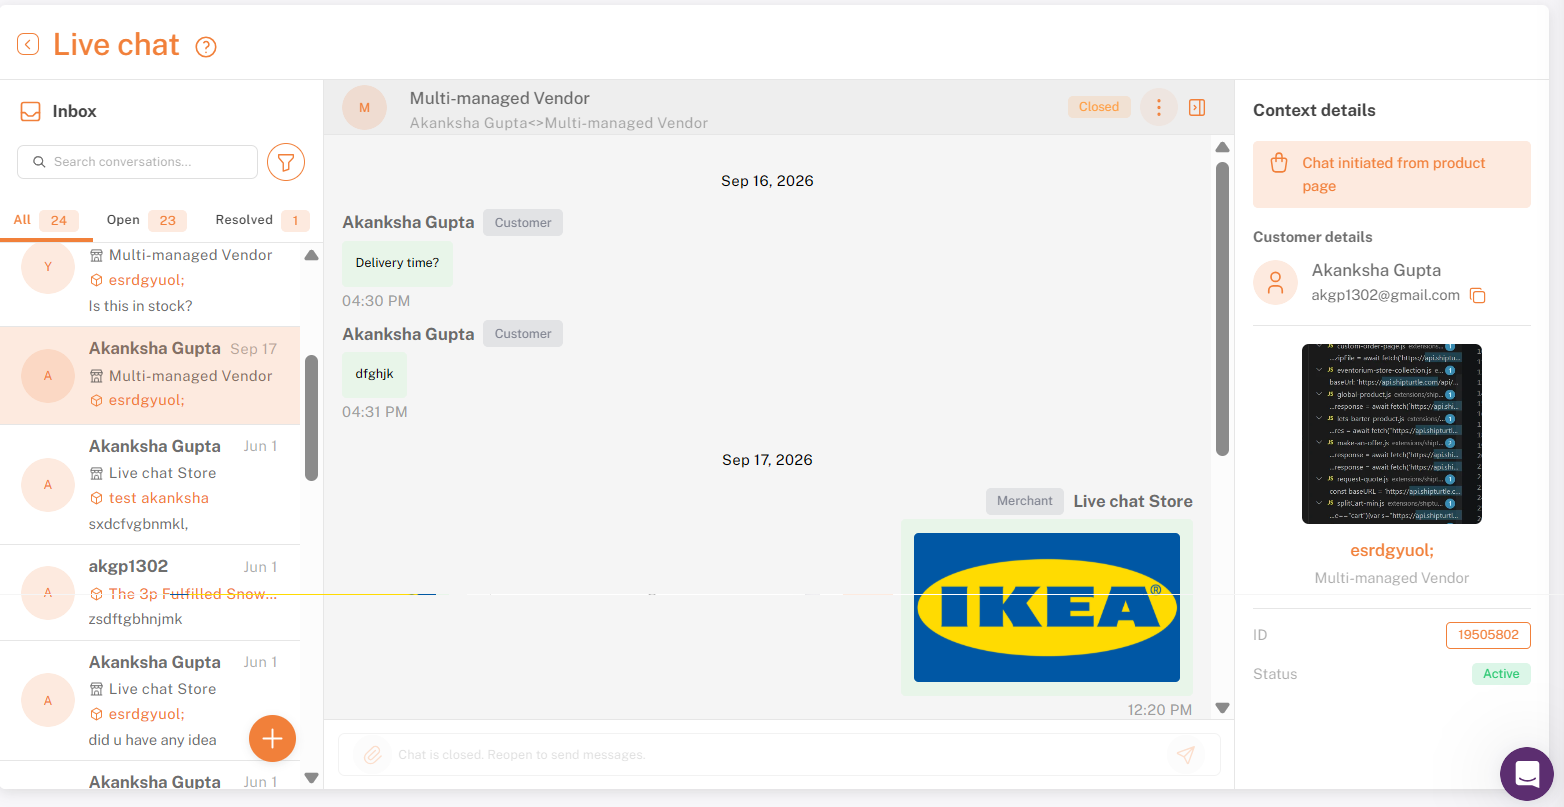
Live Chat conversation: message history and message box amd context Details panel: customer and product details
9. Resolve, Archive or Delete a Conversation
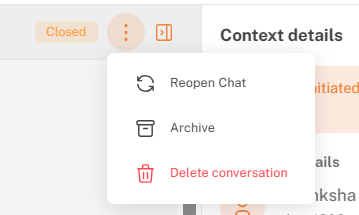
Open the conversation and click the ⋮ menu in the chat header:
- Mark as Resolved (merchants only): closes the conversation and moves it to the Resolved tab.
- Reopen Chat (merchants only): reopens a resolved conversation.
- Archive: hides the conversation from your inbox and the customer's Messages page.
- Delete conversation: removes it for everyone, including the customer. This can't be undone.
10. If the customer writes again
- A resolved or archived conversation reopens with its full history.
- A deleted conversation is not restored. The customer's next message starts a new one.
11. Notifications
- New messages, typing indicators, and read receipts appear in real time in an open conversation.
- When you reply, the customer gets an email asking them to sign in and reply. At most one email is sent per conversation every 24 hours.
- Merchants and vendors aren't emailed about new customer messages, so check the Live Chat inbox regularly.
For more information, see Add Custom Email Domain and Notifications
12. Connect a Custom Storefront with the Live Chat API
- If your store isn't built on a Shopify theme (for example, a headless website), use the Live Chat API to offer chat through your own interface.
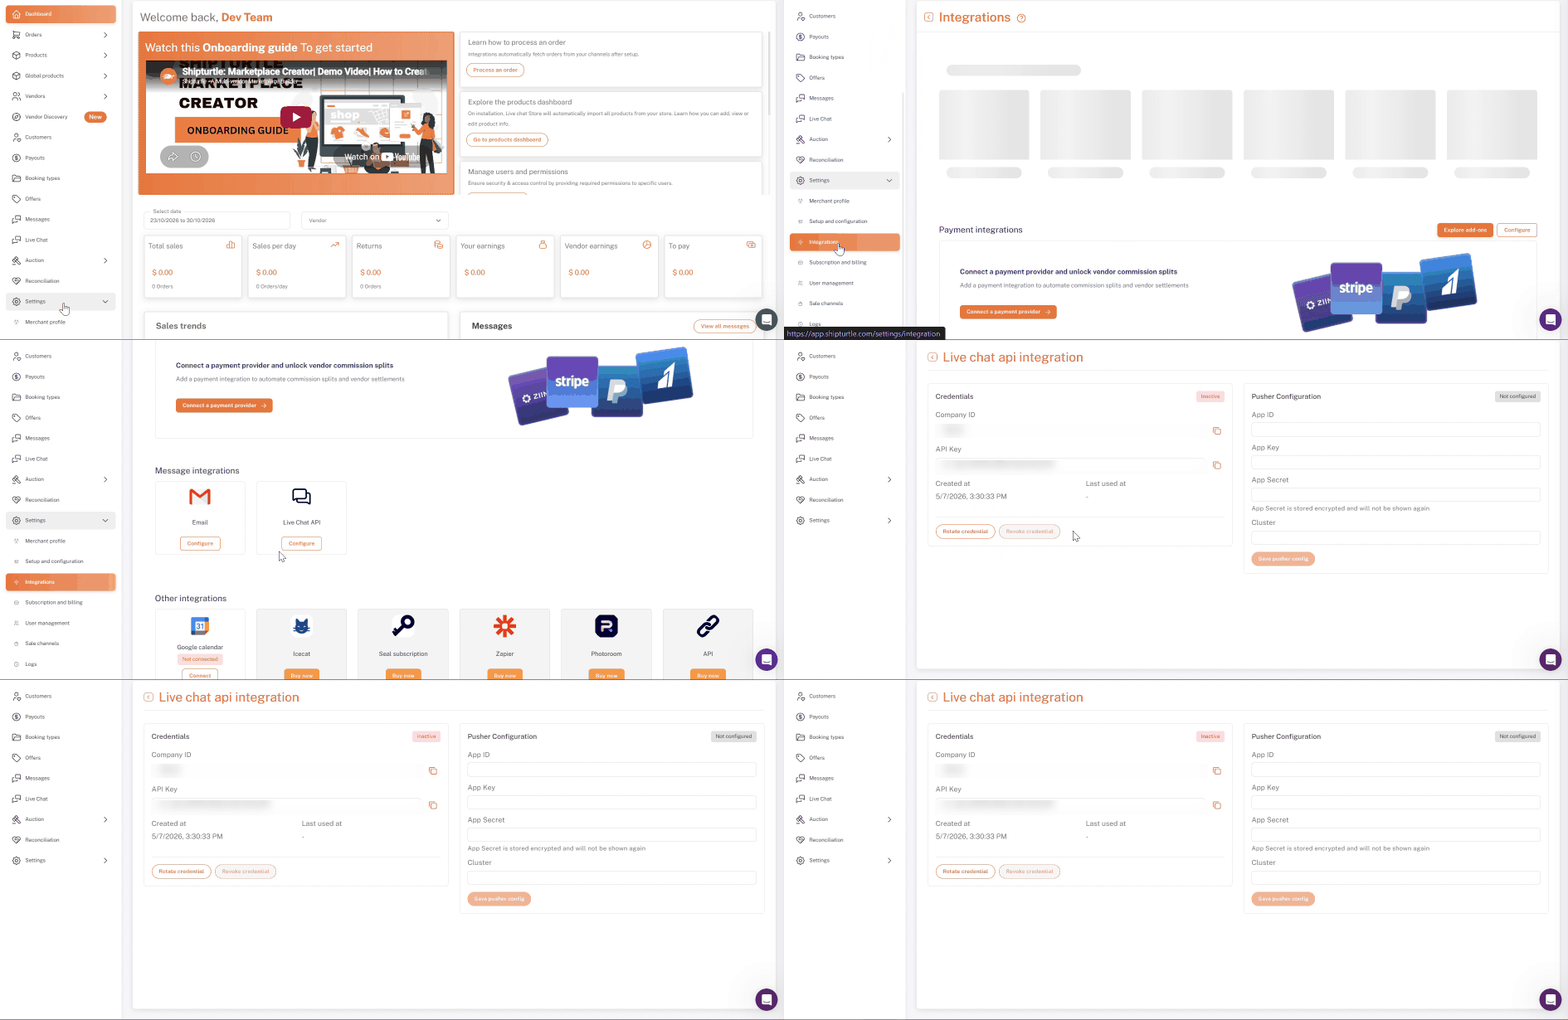
- Go to Settings → Integrations.
- Under Message integrations, find Live Chat API and click Configure.
- Click Generate credential.
13. Save Your API Credentials and Pusher Settings
- Copy the Company ID, API Key, and api_secret. Store the secret securely, as it is shown only once.
- Under Pusher Configuration, enter your Pusher App ID, App Key, App Secret, and Cluster, then click Save pusher config.
- Share the credentials with your developer to connect your storefront.
Manage your credentials
- Rotate credential: issues a new key and secret. Existing customer sessions stop working.
- Revoke credential: turns off API chat until you rotate the credential.
- Clear Pusher Config: stops real-time chat until new Pusher details are saved.
For the full API reference, contact the Shipturtle team.
FAQs & Troubleshooting
- I don't see Live Chat in my dashboard menu.
The Live Chat add-on isn't active on your account. Contact the Shipturtle team to enable it. - Customers see a sign-in prompt instead of the chat.
Live Chat works only for signed-in customers. Make sure customer accounts are turned on in Shopify. - The chat panel opens, but messages don't load or send.
Check that the App proxy URL prefix in the Live Chat block matches the App Proxy URL in Shopify Admin → Settings → Apps → Shipturtle, with no trailing slash. - Chat with seller shows a "page not found" error.
Create a page at /pages/messages using the messages template, and add the Messages block to it (see sections 2–4). - Why can't I attach a file to the first message?
Send a text message first. You can attach files from the next message onward. - As a vendor, why can't I reply to a resolved conversation?
Only the merchant can reopen it. It also reopens automatically when the customer writes again. - Can vendors see each other's conversations?
No. Vendors see only their own conversations. The merchant sees all of them. - A new conversation isn't showing in my inbox.
Switch tabs or reload the page to refresh the list. - Which languages does the storefront chat support?
Built-in text is available in English, German, Spanish, Dutch, Portuguese, Norwegian, and Romanian. Other languages show English. Text you enter in block settings is shown exactly as typed.
Related Articles
- Vendor Profile Page
- Messaging Between Buyers & Sellers (Ask the Seller)
- Add vendors and grant dashboard access
- Add Custom Email Domain and Notifications
Need Help?
If you're stuck, contact the Shipturtle support team at team@shipturtle.com or raise a support ticket through the Shipturtle support page.